Hello again and Happy Sunday.
It’s New Years Eve tonight (Yay) and that is a special occasion around my house. My hubby and two boys are more excited for this evening than for their Birthday or even for Christmas. So naturally we make a big deal out of it – even if we’re only 4 or 5 people around to celebrate it.
Every year I make decorations for New Years Eve and some is kept for next year and some don’t survive (yes it gets pretty wild around here)
This year I set my eyes on the new Candles in Three Sizes for LED Tea Lights from an upcoming kit from SVG Attic. Watch for it in a set next summer for early Christmas crafting. You can also find the Candles in the Snapdragon Snippets store or in the Silhouette Design Store.

These are very easy to make and I made all three in a jiffy. I decided, that since they are meant as decor for New Years Eve, I not only wanted them to be candles but to look like small crackers/fireworks as well. The little “fuse” or paper flame is included with the candles and is simply assembled by rolling it on a pencil or something similar and gluing the tube together. Then curl the long strips. I just put it over the LED flame but you can also glue it inside the candle hole.
I made the candles in AC Cardstock in Black and decorated them with AC POW glitter paper with a chevron pattern in silver.
And what is New Years Eve without Champagne or Champagne glasses?
So I made two 3D Champagne Glasses from the JGW New Years Celebration kit

I didn’t use acetate on mine or decorated them with gems or stones but kept them in the same color scheme as the rest of my decorations: Black, White and Silver. I don’t plan for using them for candy but I might use them as candle holders – a LED Tea Light fits perfectly in them.
I used AC Cardstock in White for the glasses and decorated them with AC POW glitter paper in Silver and Black. On the top of the glasses I put some glitter washi tape from my stash.
I must say that these were also very easy to make. The trick is to use a pencil or wooden dowel inside the stem as it helps to hold the top onto the stem and makes it more sturdy.
But wait…..there is more 😀
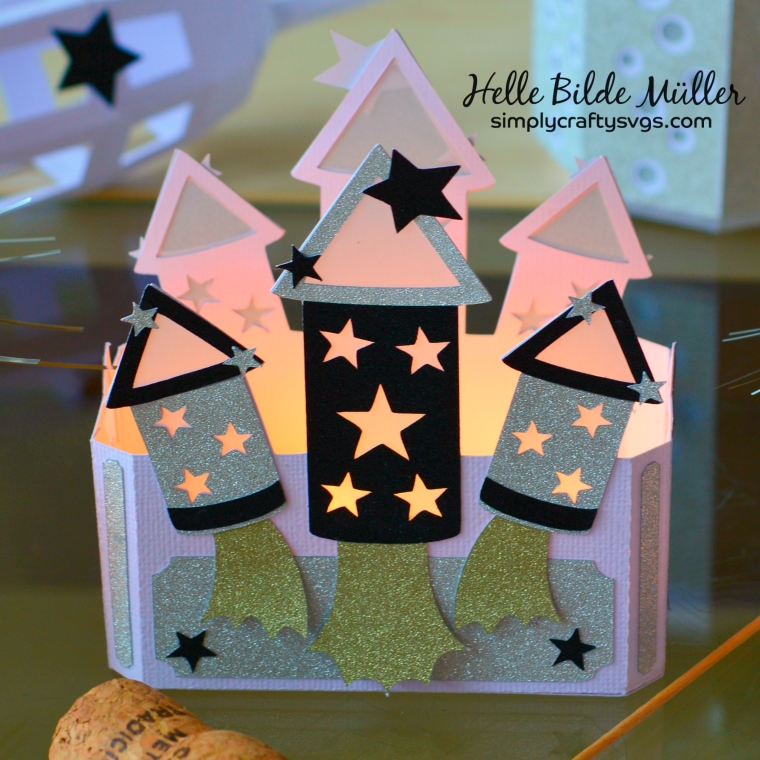
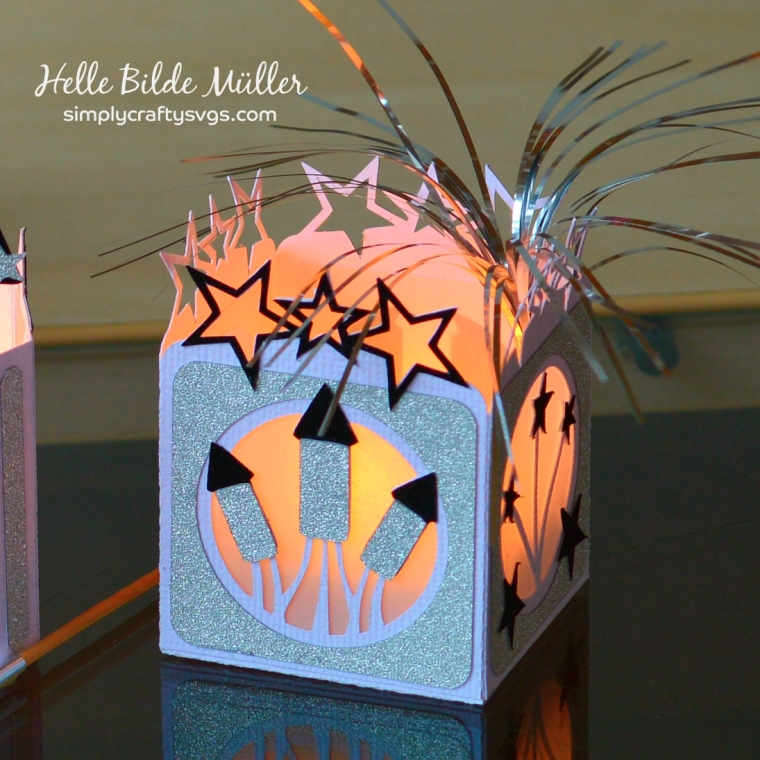
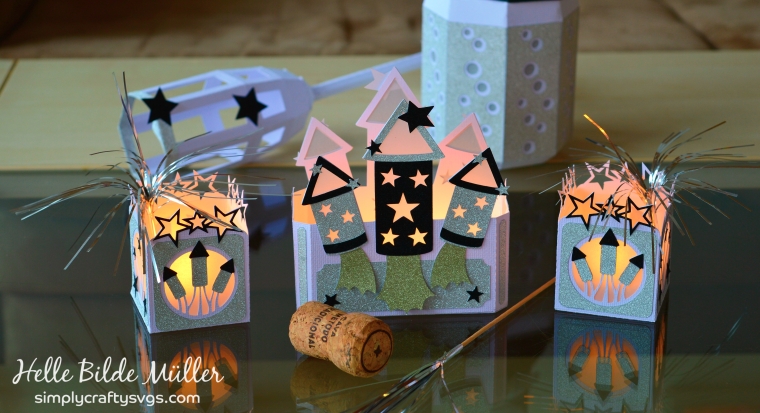
Next is the Rocket Lantern from Dreaming Tree.

This was very easy to make and I didn’t change much except the colors, left out the pipe cleaners and added some extra stars.
It is made from AC Cardstock in Black and decorated with AC POW glitter paper in Silver. I added a color shifting LED light into the rocket and it’s ready to fly 😉
Then I made a banner:

This one I found in the Silhouette Design Store (design #64583) and it’s designed by Lori Whitlock. I just love the intricate design – almost looks like lace and I found it perfect for my New Years Eve decor. It’s written in Danish and says “Happy New Year” 🙂
I made it in Black AC Cardstock and backed it with silver glitter paper – don’t you think it’s unbelievably beautiful? This one can last some years as I didn’t write any numbers on it 😉
Instead I made those numbers – 2018 – from Lori’s 3D Simple Numbers that also found in the Silhouette Design Store (#125495)

I stayed true to my color scheme and made them in AC Cardstock in Black and White along with POW Silver glitter paper. My intention is to let a LED Light String run through the letters for some extra attention 😉 I also think I might have to use a pop dot to hold them upright through out the night 😉
I also made a bottle tag 😀

This one can also be found in the Silhouette Design Store (design #239620), is designed by Daniela Moscone and is very straightforward to make. I used pop dots on the 1 and the 0 for some effect.
It’s made of AC Cardstock in White and Black along with POW glitter paper in Silver and Black.
Finally I made place cards and these I also found in the Design Store (design #238336) and they are designed by Studio Ilustrado.

I altered them a bit by removing the clock and making the zero in several layers to make a shaker card effect and used some black glitter along with silver stars inside. The card itself is also made from AC Cardstock in Black and White with POW Silver glitter paper.
I hope I can show you some before and after shots of the table and the decor (so you can see the mayhem and destruction 😀 )
Well that was what I had to show you today. I wish a Happy New Year to all of you and hope to see you a lot more in 2018
Update:
The promised before and after shot: