Chestnuts Roasting……

Today I’m going to show you something very different from what I had prepared.

Go figure! I’ve had my eye on this Christmas Fireplace from Simply Crafty Svgs for a long time. Ever since I saw it on the draft board among other designs and I instantly knew THAT was going to be a Christmas project.

So when this was released I got busy…..REALLY busy! Barely got home from the Gym today 😀

Billede 05

I’m totally in love with this cool giftbox. Especially because – well it’s a box but also because of the awesome fireplace that lits up by a LED tea light. Such a brilliant design!

Billede 06

I made mine with AC Cardstock and patterned paper from DCWV Stack Red&White Christmas and Recollections Paper Pad Wood, Marble and Brass.

I also used a bit of vellum for the flames, that I colored with Distress Ink.

The wood logs are embossed with a wood grain embossing folder from Darice and the panels on the Mantel are embossed with an embossing folder from Sizzix.

All edges are inked with matching Distress Ink and I added small gems on the cute bows on the garland.

Finally I added a bit of Stickles on the fuzzy top of the Stockings.

I do think this is a keeper. If only I can find a spot for it 😀 Otherwise I may have to make this again in a downsized version.

Billede 04

Thank you so much for joining me today. I will show you the original intended piece another day soon.

The Latest Buzz

The Sun has been out most of the day today but I’ve been a buzzzzy bee 😉

Last week, Sandy of Simply Crafty Svgs, released a new darling collection with a Bee theme and I just had to make some of the items from it 🙂

Bees are darn right cute and adorable – especially the cartoony ones 😉 They are also extremely important for our environment. Sadly they are about to go extinct due to poisons released by humans on crops. But that is a whole other story….not a pleasant one 😦

Let’s stick to the adorable cute bees, buzzing happily around from flower to flower, gathering pollen to make yummy Honey.

First of is the darling Bee Hive:

DSC_0007

This Royal Bee home is made from AC Cardstock in Butter, Coffee, Blush, Spearmint, Melon and Chestnut.

I used a Sizzix Honeycomb embossing folder on the panels and decorated with patterned paper from DCWV Samantha Rose. I also used some Rose Gold Glitter paper for the flower stamens as well as the little crown (found in the Silhouette Design Store design ID #10713 by Alaa’K) on the bee’s head. All edges are inked with Distress Ink in matching colors as well as highlighting the Honeycomb pattern.

DSC_0010


Furthermore I used some wood patterned paper from the same DCWV stack on the base of the Hive.

Now to wait for darkness so I can see it lit up by a LED candle 🙂

It’s a bit of a time consuming project but it’s so worth it and if you’re making more than one, you’ll get the hang of it and be done a lot quicker. Especially the little bee takes some time but GOSH she is so adorable ❤

DSC_0008

I used ordinary vellum for the wings and embossed them with a Cuttlebug Twig patterned embossing folder and for her eyes I used some tiny black enamel dots from my stash.

Next up is the Honey Jar:

DSC_0015

Following the same colors as before, this is made in AC Cardstock Butter, Spearmint and Latte.

I decorated with the same DCWV stack – Samantha Rose – and used the same embossing folder on the yellow panels as well as the same Distress Ink.

Furthermore I used my Foil Quill to write “Honey” on the label using Rose Gold Foil from Couture Creations and tied a hemp cord around the jar.

DSC_0013

Finally I added three tiny enamel dots on the lid.

DSC_0014

This one is a lot faster to make and is very easy – and what a pretty jar to give away as a hostess gift or as gift wrapping 🙂

Here’s the Hive and Jar together:

DSC_0005

That was it for me today – now to relax a tiny bit before bedtime – I’ve have been quite buzy 😉

Thanks for visiting. I do hope you’ll leave me a small comment below – I really love the feedback ❤


Going Out with a Bang

Hiya! I’m so glad you’re joining me today. This is my last blog post for Simply Crafty SVGs this year and I’m going out with a bang…..so to speak 😀

I decided that event though New Years Eve is still some time away, I wanted to show you the cute little lanterns I made for the occasion.

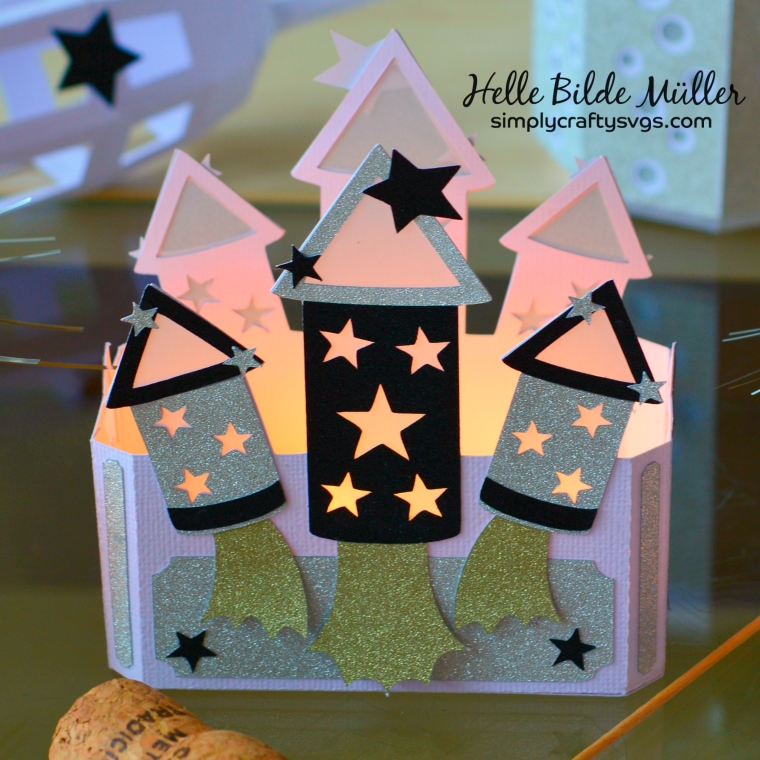
First of is the Rockets Bursting Tealight Holder:

DSC_0024

Designed for the 4th. of July, I decided to make it for New Years because here in Denmark we celebrate the new year with lots of fireworks. Every home with respect for itself, buys a ton of rockets and fireworks and shoots off the the New Year at midnight. So what more fitting than some sparkly decor with rockets and stars?

I downsized the holder by 50% and used AC Cardstock in White along with AC POW Glitter paper in Black, Silver and Gold. I also added some vellum behind the rockets.

Since it’s small, I left out the insert and placed to LED tealights inside and just look at that glow!

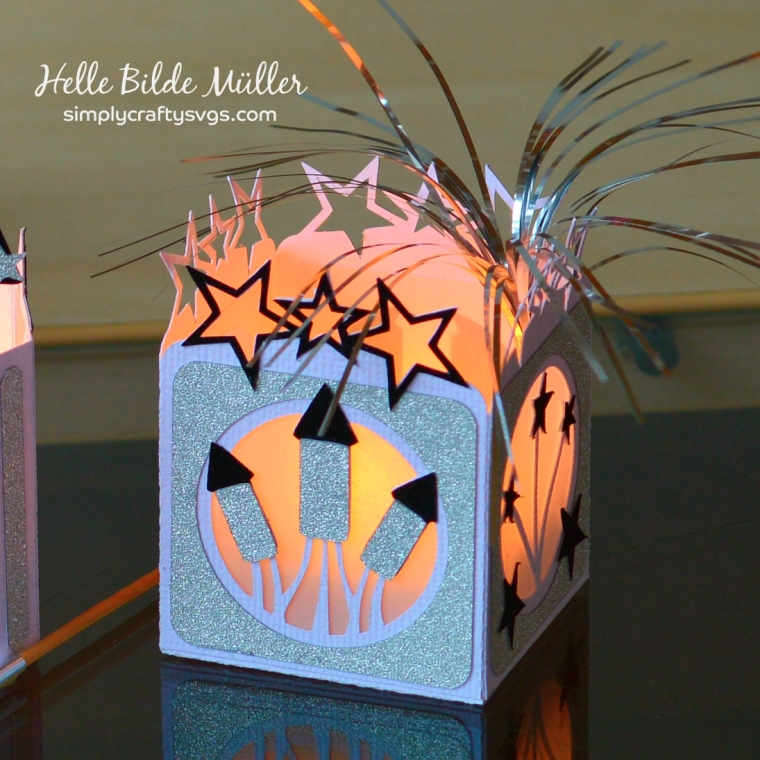
I also made the freebie 4th of July Tealight Holder:

DSC_0018

This one is also downsized by 50% and I also used AC Cardstock in White along with AC POW Glitter paper in Black and Silver.

I did use some of the left over stars + a few that I made to decorate the side with the star burst and added vellum behind the cutouts. Isn’t it darling?

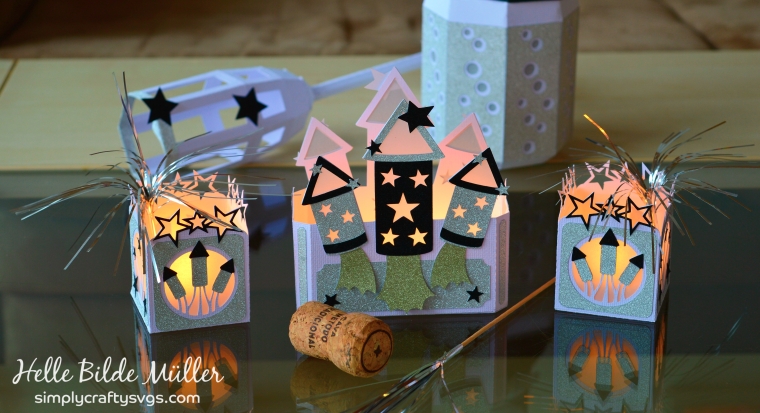
Here’s the entire project:

DSC_0020

Yes I so ready for New Years – usually such a fun night 🙂

Thanks for joining me today. I hope you’ll have a very Merry Christmas and a lucky and happy New Year. See you in 2019 ❤

The Year’s Last, Loveliest Smile

Hello and Happy Autumn Sunday

Now that Halloween is over, I can start to concentrate on other projects and feeling that I’ve neglected Fall a bit, I’ve decided to make a few more projects with the lush and wonderful colors.

First of I made the Barn 3D Model:

DSC_0004

I downsized it by 50% to match some of my other mini houses and left the roof unglued so I’m able to change the small LED candle inside.

It is made from AC Cardstock in Chestnut and Cranberry along with Bazzill Bling Cardstock in a light grey.

I also used some vellum behind the doors and windows and decorated with Prima flowers and different pearls and gems from my stash.

A totally adorable little fall barn and VERY easy to make – even this small.

I also made the Autumn Bouquet Card from the JGW Enchanted Autumn kit:

DSC_0012

I used AC Cardstock in Chocolate, Vanilla, Mustard, Rouge, Cranberry, Coffee, Plum, Abricot, Rust and Banana along with Bazzill Swiss Dot Cardstock in light yellow and patterned paper from Recollections’ “Autumn Dream”

I inked all the edges with Distress Ink in matching colors and used two screw-like brads to hold the tag.

DSC_0014

The sentiment I found in the Silhouette Design Store design ID #23118 by Rivka Wilkins and used the Print and Cut function for it.

I really think what it says it true; Autumn really is the years last, loveliest smile 🙂

Thanks for joining me today – hope to see you again soon.

New to SVG Attic?  Check out these awesome places!

SVG Attic – Snapdragon Snippets

SVG Attic Facebook Page

SVG Attic Blog

SVG Attic Pinterest

Warning: Not for the Faint of Heart!

My last Halloween post – this year. Going out with a bang or maybe a kill….so to speak!

Ever since the Spring when SVG Attic released the Make a Splash kit, I knew what I wanted to do with the 3D Bath Tub.

Knowing my evil, crooked mind, you would too….MUAHAHAHAHA

Halloween of course – but what does a bath tub have to do with Halloween?

Setting the scene: A woman is taking a long hot bath in the tub/shower and is not seeing the figure coming into the room with a knife in the hand – Next thing….she is being stabbed to death and blood spills all over the tub and shower curtain.

Recognize this scene????

DSC_0006

Yes it’s the famous shower scene from the movie Psycho – only a little more graphic since it’s in color.

I really had fun making this and it did take me a while as I had to figure out how to make the shower curtain.

Using my scout-day skills (LOL) I tied some hibachi skewers onto a metal ring and covered it all with black flourist tape.

Then I added the curtain which is made from vellum and folded here and there to give the impression of a hanging curtain.

DSC_0011

The Tub is made from AC Cardstock in Ash and with patterned paper from DCWV’s Spooky and Sparkly collection. I also used Silhouette Printable Silver Foil for the faucets. I created the top shower head myself out of the bottom faucet and some circles I stacked together.

DSC_0012

I then painted the inside of the tub to make it all white and a tiny bit shiny. Once that was dry, I went to town with the blood splatter – using a brush and some red paint. The bloody handprint on the curtain is made from red vinyl.

DSC_0010

The shower mat and the knife are both from the Silhouette Design Store (Knife: Design ID #116580 by Studio Ilustrado and Mat: Design ID #1565 by Silhouette)

DSC_0008

I know this isn’t for the faint of heart, but it was so much fun for me to make and to able to actually create an idea that just pops into my head, is fantastic.

I do hope you’ve enjoyed this bloody project and all the other Halloween projects I’ve made throughout the month. Thank you so much for joining me and my vivid imagination.

Now it’s time to turn my attention towards something else.

New to SVG Attic?  Check out these awesome places!

The Beach House

Hello – so nice of you to drop in today 🙂

No question that summer has hit – here in Denmark we have the warmest and driest in like forever, so lots of folks are headed to the beach as soon as they get the chance. Well….I’m not really into the beach. I mean it’s beautiful and all but I pass at the chance of getting sand in every crack and I like to swim without any crabs or fish in the water. Yes I am a pool person. I do enjoy going to the beach to take pictures and the view of the water has always had a calming effect on me. Maybe because I was born close the sea? I don’t know. Now I live somewhat far from it (can’t get that far from the ocean here in Denmark 😀 )

Ok – get to the point Helle!

When I saw the new cute bundle Nautical Nights from Dreaming Tree, I totally fell in love with the adorable Beach House. And I had just the paper for it – Seashore from Prima Marketing Inc.

DSC_0003

I used AC Cardstock in White and Dark Kraft to make the house, roof and dock and decorated with the patterned paper and some small fun trinkets from my stash.

DSC_0004

I did make a few changes as I wasn’t too fond of the big anchors, so I switched them out with the Shell from the Scalloped Shells Tea Light Holder freebie and the Shell from the Nautilus Luminary (on the back – sigh! ) I also downscaled the entire house to 75%

I tried getting a few night shots – not easy as it doesn’t get dark until pretty late in the summertime but here are a few so you can see (or just imagine) the light switched on inside 😉

DSC_0017DSC_0015

I also played a bit with the darling Fish Scales Lantern Freebie.

DSC_0011

I used AC Cardstock in Shamrock along with patterned paper from Graphic 45 – Voyage Beneath the Sea, striped peach colored vellum and gold vellum.

I changed out two sides of the lantern with the adorable seahorse from the Seahorse Box and added black enamels dots as eyes and some bubbles dots here and there. Finally I tied some raffia onto it as a handle. Cute right? Oh and this one is also downscaled to 75%

And a “night” shot: 😉

DSC_0019

Here is a better one from inside my room – you can really see the light shining through.

img_2133

Thanks for joining me today. I hope you liked the Beach House and the Lantern. I’m going to enjoy the rest of evening in my craft room, with two fans and an aircon turned on, trying to see if my melted brain can come up with new projects. 😉

Happy Birthday Mom!

My Mom’s birthday is tomorrow and I just want to show you what I made for her (we celebrated today so now it’s ok for me to show you 😀 )

Dreaming Tree recently released the Cupid Crush Bundle and this is where you’ll find the Love Blossom Pop Up Card. DSC_0004

I did alter my version a bit – leaving out some of all the hearts. I also added three flowers from the Apple Blossom Lantern,  also from Dreaming Tree, to the front of the card.

I made the card itself from a piece of Prima “Raspberry Tea Collection” paper. Then I added some white pearl paper that I embossed with a Tuscan Tile pattern.

The flowers are made from AC Cardstock in Rosebud and Shrimp and the leaves are in Grass. Then I added some white pearls along with some gold sequins, Doodlebug jewels and a gold embellishment I happened to have in my stash.

The card is a pop up card and here’s a look of the inside of the card:

DSC_0006

It was this gorgeous lush flower that sold this card to me!

I made it from vellum that I inked with Prima chalk ink. The flower center is made from green vellum and the leaves are AC Cardstock in Grass and Key Lime.

So that was the card.

I also made her a flower decoration:

DSC_0002

This is the Mothers’s Day Bon Bon Bouquet again from Dreaming Tree.

I changed out the heart on the front with a Peony flower from the Peony Gift Box also a Dreaming Tree design.

The box is made from AC Cardstock in White and decorated with panels made from Prima “Raspberry Tea Collection” paper.

The Peony is made from AC Cardstock in Rosebud and Cotton Candy with leaves in Leaf and the center is Banana.

The Bon Bon Flowers are made from AC Cardstock in Rosebud, Shrimp, Cotton Candy, Latté and Robin’s Egg and the leaves and tendrils are made from Leaf and Mint.

All edges are inked with Prima Chalk ink.

I’m very sure my Mom loved it – she loves everything that I make her 😀

Happy 69’th Birthday tomorrow Mom!


Moroccan Lantern

What is more fun, that being able to make something your own. To be able to alter one design into something more you or something that speaks to you more. How ever you want to put it….it’s fun and challenging 🙂

I got the opportunity, when Bird released her new collection Truly, Madly, Deeply . And it was indeed a challenge! I used most of day and a night to figure out how to change the pattern in the Heart Shaped Lantern and I think I pulled it off rather nicely:

DSC_0018

Now this is not for newbies! You have to use several features in the Silhouette software like release compound path, cropping and welding and eventually you end up with something you like 😀 The only thing I’m not satisfied with, is that I would like to have the main patterned be an offset of the panel pattern – like Birds lantern – but I simply couldn’t make that happen. The pattern I’m using is Moroccan Background by Ginny Nilson design ID #11449 in the Silhouette Design Store but you can use lots of other backgrounds or patterns. Just play around with it.

I used AC Cardstock in Grape along with patterned paper from Graphic 45’s Midnight Masquerade and vellum in Teal to make the lantern.

DSC_0020

I decorated it with a butterfly from Prima and flowers also from Prima.

DSC_0022

I definitely had fun with this one and love that Bird’s files are so versatile and can be altered into something different. Give it a shot!!!!

And how about this night shot:

DSC_0002

Gorgeous isn’t it?

Thanks for stopping by and please remember to leave comment ❤