Super Bowl

Now there’s a headline I never thought I’d write! 😀

I’m so not interested in watching sports what so ever. To me it’s something you do and not something you watch on TV. It’s just too boring.

Sunday February 2nd., I’m told, is Super Bowl Sunday in the US and a girlfriend of mine loves it. She’s been helping me out quite a lot with the move, so now it’s payback time 😉

I’ve made her Football stuff before but when I saw the new cool Football files from Simply Crafty Svgs, I knew I had to make them for her – so I did.

Let’s start with the smallest first – the Mini Football Treat Box (Freebie):

DSC_0004

I made two – one for my friend and one for her brother, who will be watching the game with her.

Made from Gold Glitter paper from Recollections, White Glitter paper from Craft Smith and black POW Glitter paper from AC along with a Print and Cut sentiment that I ran through my Minc to add Gold Foil. The tag is tied to the box with a piece of hemp cord.

Very easy and I’m very surprised how well the glitter paper took to the glue. Now I just have to find some little treat to put inside…..

Next is the Football Goal Post Box:

DSC_0009

This very fun and inventive treat box, is made from AC Cardstock, White Glitter paper from Recollections and Green Glitter paper from DCWV Inc + a small piece of acetate.

It was very easy to assemble and I didn’t watch the video until after I made it 😀 As you can see I did make an error but I thought the slits in the Football was to hold the acetate and not guidelines for the white end pieces. Go figure! Oh well – it works just fine 🙂

DSC_0010

The Foam Finger (ID #241075 by Photoplay) and the Pennant (ID #283540 by Lisa Norris) are both from the Silhouette Design Store. I made them as Print and Cut and ran them through the Minc to add the Gold Foil. Not perfectly covered but I blame my printer being too cheap 😀 I did make a back side too with out graphic so I could sandwich a toothpick in between.

DSC_0011

Finally for the Football Helmet:

DSC_0005

This is also a treat box and I put some crackers inside for the two to munch on.

DSC_0007

It’s made from AC Cardstock, Gold and White Glitter paper from Recollections and Black POW from AC.

I’m really surprised how easy this was to make. I did watch Sandy’s video as I believed it would be harder to assemble, but no. Very easy and such a cool design too. I’m so impressed with her inventive and amazing ideas.

I chose the gold color for the treat box and helmet as I have no idea what team she roots on, who would make it to the finals or how any of the teams’ logos look like 😀 heh heh Gold is for winners – right?

DSC_0002

These were so much fun to make and as I ran out of time, I didn’t have time to ink the edges – but you can’t really tell….or? 😉

I really hope she and her brother will love these and the goodies I’ll put inside and that they will have a cozy and enjoyable Sunday night/Monday morning 😉

Thanks for joining me today. I’ve enjoyed seeing all the Helmets and boxes already made by lots of people – hope you enjoy mine.

See you next time ❤


Fabulous at 50

Thursday my friend turned 50 and tonight we’re celebrating her. Wow – 50 already! 😮 (I’m naturally YEARS away from that – still a kitten of 29 😉 )

This fabulous lady loves her shoes, bags and (like me) Rock Music 🙂 So how to combine these into a present?

First I found the items I wanted to make. SVGCuts is one of my favorite go-to places and she didn’t disapoint 🙂 Then I found the paper – all perfect together. And what more perfect than a 50’s theme for at 50th Birthday????

Ok – first of is the Stylish Handbag from the  Brunch Party SVG Kit:

DSC_0008

I used AC Cardstock in Black and Robin’s Egg and decorated with papers from Authentique’s “Fabulous” Collection along with glitter paper in teal, glossy paper in black and gold foiled cardstock.

I inked all the edges with Distress Ink in matching colors and added a few cut outs from the paper kit to the tags, that I attached with a ball chain and decorated with an fluffy embellishment from my stash.

DSC_0010

I made the bag in 75% and it’s perfect for holding my gift for my friend.

I also made her a card and my choice fell on the “Party Card – 33” and the sleeve from the “Happy Birthday Card – 45” from the Rockin and Rollin SVG Kit:

DSC_0016

This is made from AC Cardstock in Black and Vanilla and decorated with the same papers as the bag except the sleeve which is made from paper from the “Dapper” Collection also by Authentique.

DSC_0018

I decorated the sleeve with a few stickers from the kit and some flowers from Prima plus a few coordinating enamel dots.

DSC_0014

The Envelope is made from the “Fabulous” paper.

Now I’m really excited to see her reaction to this present – I mean – that is one bag she doesn’t have in her HUGE collection 😉

DSC_0001

Thanks for joining me today – please remember to leave me a small comment below and have an awesome and crafty weekend ❤


Happy Snowman

The calendar says Winter and Winter equals snow…..at least in some places. We have only had a few flakes hit the ground but it sure has gotten cold enough for the white gold to make it’s glorious entry. Yeah it’s hard being a winter/snow lover in Denmark these days.

While still eagerly awaiting some heavier snowfall, I made this tiny cute Smiling Snowman from Simply Crafty SVGs.

dsc_0033

He is made from AC Cardstock in White, Chestnut, Black and Melon and decorated with Best Creation White Glitter paper and AC POW Glitter paper in Purple and Teal.

I downsized him to 50% of the original and that only made him cuter 🙂

I also made him a tiny lantern to keep him cozy in those looooong cold winter nights. It’s made from the Mini Hanging Lantern (freebie) and the Square Classic Lantern (the one with the cross windows).

dsc_0037

I simply added the cross windows to the Mini Hanging Lantern and then I shrunk it down a lot to make it fit in size for the tiny snowman. I also added a tiny LED light inside it.

Now he can keep me company while waiting for a Winter Miracle in the form of snow.

Thanks for stopping by – please come back soon  and also please leave me a comment below.

Going Out with a Bang

Hiya! I’m so glad you’re joining me today. This is my last blog post for Simply Crafty SVGs this year and I’m going out with a bang…..so to speak 😀

I decided that event though New Years Eve is still some time away, I wanted to show you the cute little lanterns I made for the occasion.

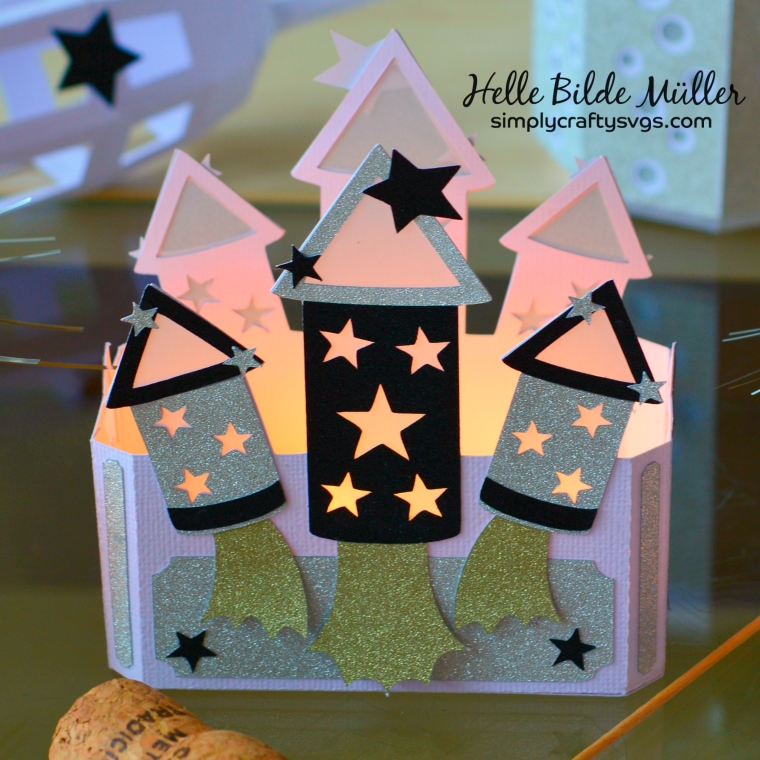
First of is the Rockets Bursting Tealight Holder:

DSC_0024

Designed for the 4th. of July, I decided to make it for New Years because here in Denmark we celebrate the new year with lots of fireworks. Every home with respect for itself, buys a ton of rockets and fireworks and shoots off the the New Year at midnight. So what more fitting than some sparkly decor with rockets and stars?

I downsized the holder by 50% and used AC Cardstock in White along with AC POW Glitter paper in Black, Silver and Gold. I also added some vellum behind the rockets.

Since it’s small, I left out the insert and placed to LED tealights inside and just look at that glow!

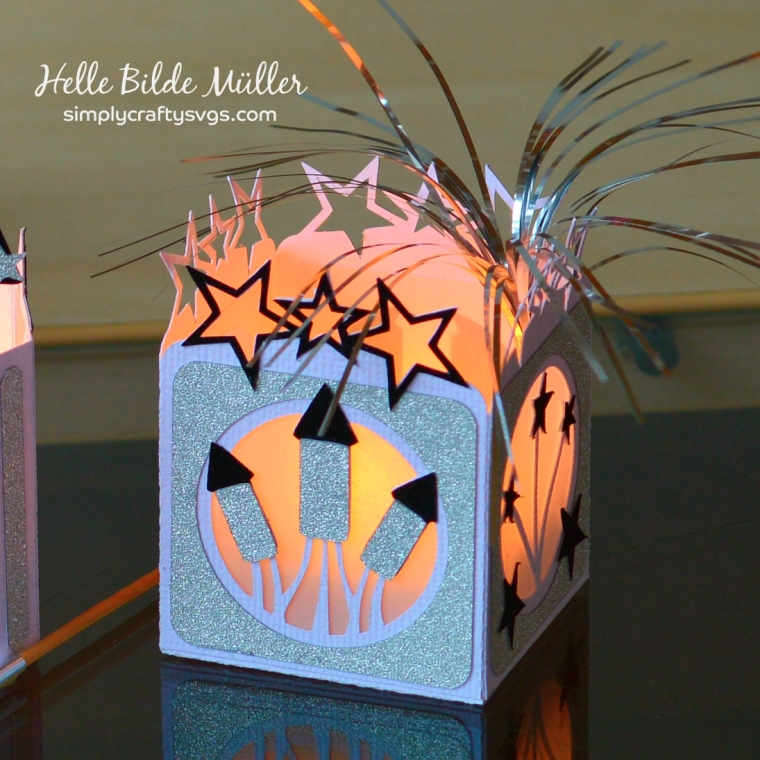
I also made the freebie 4th of July Tealight Holder:

DSC_0018

This one is also downsized by 50% and I also used AC Cardstock in White along with AC POW Glitter paper in Black and Silver.

I did use some of the left over stars + a few that I made to decorate the side with the star burst and added vellum behind the cutouts. Isn’t it darling?

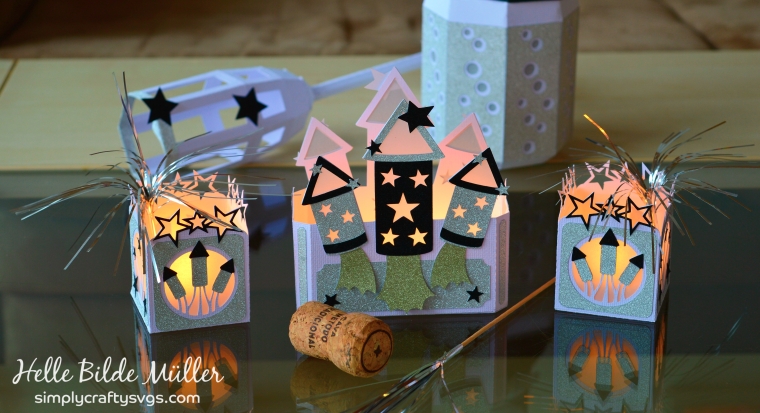
Here’s the entire project:

DSC_0020

Yes I so ready for New Years – usually such a fun night 🙂

Thanks for joining me today. I hope you’ll have a very Merry Christmas and a lucky and happy New Year. See you in 2019 ❤

New Years Eve Decorations

Hello again and Happy Sunday.

It’s New Years Eve tonight (Yay) and that is a special occasion around my house. My hubby and two boys are more excited for this evening than for their Birthday or even for Christmas. So naturally we make a big deal out of it – even if we’re only 4 or 5 people around to celebrate it.

Every year I make decorations for New Years Eve and some is kept for next year and some don’t survive (yes it gets pretty wild around here)

This year I set my eyes on the new Candles in Three Sizes for LED Tea Lights from an upcoming kit from SVG Attic. Watch for it in a set next summer for early Christmas crafting. You can also find the Candles in the Snapdragon Snippets store or in the Silhouette Design Store.

DSC_0009

These are very easy to make and I made all three in a jiffy. I decided, that since they are meant as decor for New Years Eve, I not only wanted them to be candles but to look like small crackers/fireworks as well. The little “fuse” or paper flame is included with the candles and is simply assembled by rolling it on a pencil or something similar and gluing the tube together. Then curl the long strips. I just put it over the LED flame but you can also glue it inside the candle hole.

I made the candles in AC Cardstock in Black and decorated them with AC POW glitter paper with a chevron pattern in silver.

And what is New Years Eve without  Champagne or Champagne glasses?

So I made two 3D Champagne Glasses from the JGW New Years Celebration kit

DSC_0002

I didn’t use acetate on mine or decorated them with gems or stones but kept them in the same color scheme as the rest of my decorations: Black, White and Silver. I don’t plan for using them for candy but I might use them as candle holders – a LED Tea Light fits perfectly in them.

I used AC Cardstock in White for the glasses and decorated them with AC POW glitter paper in Silver and Black. On the top of the glasses I put some glitter washi tape from my stash.

I must say that these were also very easy to make. The trick is to use a pencil or wooden dowel inside the stem as it helps to hold the top onto the stem and makes it more sturdy.

But wait…..there is more 😀

Next is the Rocket Lantern from Dreaming Tree.

DSC_0007

This was very easy to make and I didn’t change much except the colors, left out the pipe cleaners and added some extra stars.

It is made from AC Cardstock in Black and decorated with AC POW glitter paper in Silver. I added a color shifting LED light into the rocket and it’s ready to fly 😉

Then I made a banner:

DSC_0007

This one I found in the Silhouette Design Store (design #64583) and it’s designed by Lori Whitlock. I just love the intricate design – almost looks like lace and I found it perfect for my New Years Eve decor. It’s written in Danish and says “Happy New Year” 🙂

I made it in Black AC Cardstock and backed it with silver glitter paper – don’t you think it’s unbelievably beautiful? This one can last some years as I didn’t write any numbers on it 😉

Instead I made those numbers  – 2018 – from Lori’s 3D Simple Numbers that also found in the Silhouette Design Store (#125495)

DSC_0011

I stayed true to my color scheme and made them in AC Cardstock in Black and White along with POW Silver glitter paper. My intention is to let a LED Light String run through the letters for some extra attention 😉 I also think I might have to use a pop dot to hold them upright through out the night 😉

I also made a bottle tag 😀

DSC_0004

This one can also be found in the Silhouette Design Store (design #239620), is designed by Daniela Moscone and is very straightforward to make. I used pop dots on the 1 and the 0 for some effect.

It’s made of AC Cardstock in White and Black along with POW glitter paper in Silver and Black.

Finally I made place cards and these I also found in the Design Store (design #238336) and they are designed by Studio Ilustrado.

DSC_0013

I altered them a bit by removing the clock and making the zero in several layers to make a shaker card effect and used some black glitter along with silver stars inside. The card itself is also made from AC Cardstock in Black and White with POW Silver glitter paper.

I hope I can show you some before and after shots of the table and the decor (so you can see the mayhem and destruction 😀 )

Well that was what I had to show you today. I wish a Happy New Year to all of you and hope to see you a lot more in 2018

Update:

The promised before and after shot:

A Toast To Your New Year

Hello and thanks for joining me today.

I just want to show you the card I made for my friends Birthday (it’s today: Happy Birthday Sys!)

Usually I don’t want to make Christmas themed cards for people who has Birthday around Christmas or New Year themed cards for those, who’s Birthday is close to the New Year, because I think it important that their Birthday be celebrated like everyone else’s. But in this case I made an exception.

DSC_0008

This card is from the JGW New Years Celebration kit and I saw two meanings in the sentiment – One for toasting in the New Year and one for toasting in somebody’s new year…..a Happy Birthday.

I made the card in Black and White AC Cardstock along with gold pearl paper, gold and silver AC POW glitter paper and gold and silver adhesive foil from Silhouette. Then I simply added some small bubble gems from Queen & Co. and Voila!

 I gave my friend this card along with a bottle of bubbly Asti Spumante so she has something to toast in the New Year and her new year 🙂

Thanks for joining me today – please come back tomorrow where I’ll show you some of my New Years Eve decorations I just made. Oh and please don’t forget to write me a little comment 😉

New to SVG Attic?  Check out these awesome places!

Colorful Christmas

Today I want to show a small project I’ve been meaning to make for quite some time now. I admit I was a bit intimidated by it, but lately some of my projects have been rather challenging so I looked at it again and thought: Naaahhhh you can do it!

I’m talking about the cute Candy Cane Box from the JGW Santas Repose kit from SVG Attic.

DSC_0024

It’s made from Rouge AC Cardstock and the stripes are some thin washi tape I found in my stash. Made it very easy to wrap.

The pinecone is made from Chestnut AC Cardstock and decorated with two types of glitter so it looked frosted.

DSC_0030

Finally the holly is made from Pine and Spinach AC Cardstock and decorated with Cricket POW Glitter paper from AC.

DSC_0032

I am really surprised how easy everything was to make and assemble – what was I fearing???? Sometimes you just have to tell that head of yours to be quiet and dive in! 😉

I stuffed this baby full of red, green and purple Skittles and it’s all ready as gift for a lucky someone.

Thanks for stopping by today – ahead is a full month of Christmas with lots of creative projects, yummy treats and lots of cozy moments with friends and family…..Oooooooh I’m so excited!

New to SVG Attic? Check out these awesome places!
SVG Attic Website
SVG Attic Facebook Page
SVG Attic Fanatics Facebook
SVG Attic Blog
SVG Attic Pinterest


Time for Christmas

It’s getting closer and closer 🙂 And I for one am like a child – I can’t wait.

Talking about Christmas in all it’s glory, glitter and coziness ❤

One of my new Christmas decorations is the Gingerbread House Clock from Bird’s Christmastime SVG Collection:

DSC_0010

The house itself is made from AC Cardstock in Caramel and decorated with White Glitter Paper from Best Creation and pink/rose colored POW Glitter paper from AC. The base is made from White AC Cardstock and the panels are patterned paper from My Minds Eye “Colorful Christmas”. The vellum is from a local craft store and is patterned with white swirls.

I embellished with different sizes of white glitter domes and painted the second hand with a white sharpie and rose colored Stickles glue.

As I was thinking it would be awesome to tell time at night also, I cut out the numbers on the watch through all the layers and added some vellum behind – works like a charm 😉

DSC_0008

Love this Gingerbread House Clock. It’s tick tock’ing away in my living room and is a gorgeous addition to all my other luminary Christmas Decorations.

Thanks for stopping by today – I’ll be back soon with another Christmas project 😉


Skellington on a Stick

Hello – hope you’re having an amazing Tuesday today 🙂 Mine’s been pretty lazy so far but I guess soon I’ll have to go stretch the old bones and go for a walk.

Talking about bones….I was so inspired by Annita Kristine Schøtt Pedersen’s cute snowman on the SVG Attic Fanatics FB page yesterday, so I had to make one myself. I don’t know how the idea popped into my head, but I realized that I wanted to make him into Jack Skellington from “The Nightmare before Christmas”

DSC_0005

He is made from the Spring Spiral Snowman from the  JGW Made of Snow kit. All I had to alter was the face (found one in the Silhouette Design Store #156604), make the butterfly by welding two bats from the Silhouette Design Store (found here and here) and draw some white lines with a Sharpie.

I also cut some “hands” in white and added to the arms on both front and back and finally I made a button from the skeleton on the Mourner’s Hat from JGW Raven Quest.

I used AC Cardstock in Black and White along with AC POW Glitter paper in Charcoal and a tiny bit of black floss for the button.

Thanks for stopping by and remember to leave that little special comment for me to read 😉

New to SVG Attic?  Check out these awesome places!

SVG Attic Website

SVG Attic Facebook Page

SVG Attic Blog

SVG Attic Pinterest


Batty for Halloween…..

….yup you know it’s me 😀 It is my favorite Holiday of the year – bigger than Christmas. So I have to start early if I have to make it in time with all the new decorations to make. And today I also celebrate being a new Team Member on the SVG Attic Inspirations Team ❤

This time I want to show you the two adorable Bats on Stands designed by Jodi G. Warner for SVG Attic (get them here) as part of an amazing Halloween collection JGW Night Enchantments:

DSC_0003

For this projects I used lots of Black AC Cardstock and a little Wine and Leaf. I also used Graphic 45’s “An Erie Tale” papers and black glitter paper (for the swirly parts of the bats) I inked all the edges of the black cardstock with a grey inkpad and used a dark brown inkpad for the patterned paper. I decided to make the bats a tad more scary by embellishing with some Halloween charms and adornments.

I really loved how easy these were to assemble. I originally intended to make only one of the bats but loved it so much, I had to make the other one too 😀

Here are some more pictures of the project:

I am really excited to be on the SVG Attic Team and look forward to making lots fun stuff in the future since they have all these amazing files to play with ❤

Thanks for stopping by and don’t forget to write me a little something 😉

New to SVG Attic?  Check out these awesome places!